
Importing from QuickBooks Online
The QuickBooks Online import feature in Tax1099 connects your QuickBooks Online account to Tax1099 for easy data transfer. It imports payment information directly into Tax1099, populating forms such as 1099-NEC and 1099-MISC.
Navigate to the Tax1099 interface at Tax1099 - Quickbooks Online to import data from QuickBooks Online to Tax1099.
To import data from QuickBooks Online to Tax1099, perform the following steps:
1. Login to the Tax1099 application.
2. Click Imports from the left pane, integrations partners page appears, and then click QuickBooks Online.
The QuickBooks Online integration page appears.
3. Click Connect to QuickBooks, redirects you to the Intuit login page.
4. Login to the QuickBooks Online portal using QuickBooks Online credentials.
5. Select the company from the list and click Next.
6. From the left pane, select Expenses, and then Vendors.
The Vendors details tab appears.
7. Click New Vendor to create a new vendor.
8. Enter the required details and then click Save.
The new vendor is successfully saved.
9. Under New transaction, select Bill.
The Bill page appears.
10. Enter the required tag details and click Save.
11. (Optional) Click Save and New to save the current bill to add a new bill.
12. Click Mark as Paid.
The Bill Payment page appears.
13. Select the Payee and Bank/Credit Account from the respective lists.
14. Verify the details and click Save and Close.
The bill amount is successfully saved.
15. Navigate to the Bills tab and verify the created bill details under Paid.
16. From the top right corner, click the Settings icon, under Settings, select Chart of Accounts.
The Chart of Accounts details tab appears.
17. Click New to map the expenses in charts of accounts.
18. Click the  Bento menu icon and click Tax1099 under My Apps.
Or
Navigate to Apps and click Find Apps.
Search and select Tax1099, and then click Launch.
The Get App pane appears.
19. Select the appropriate company and click Install.
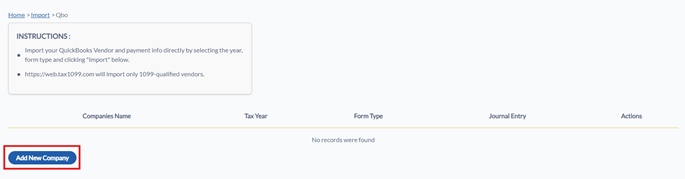
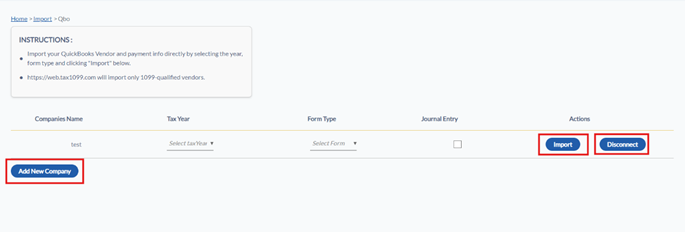
The newly added company is added to the QuickBooks Online integration page.

20. Select the tax year from the Tax Year list.
21. Select the form type from the Form Type list.
22. (Optional) Click Disconnect to disconnect the imported company details.
23. Click Import.

24. Select the appropriate check boxes from the left pane that apply to your vendors.
25. Map the Chart of Accounts (CoA) based on the required box amounts.
26. Click Next.
The Edit Data page appears.
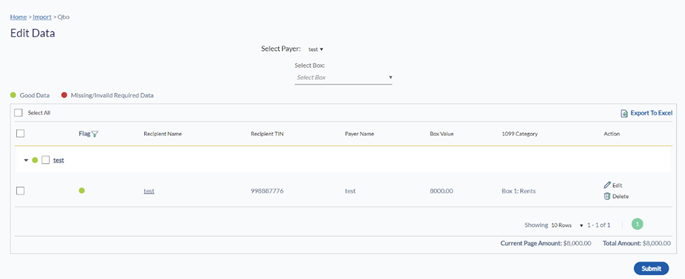
27. Verify the imported data and correct any missing or incorrect recipient information.
28. (Optional) Click the  Edit icon to edit the payer information.
29. (Optional) Click the  Delete icon to delete the payer information.
30. Click the Select All check box and then Next to proceed with the import.
The selected forms are successfully imported and listed on the Forms listing page for submission.
Note: If you manage multiple companies, import one company data at a time. After completing the import for one company, click Add New Company again to initiate the import for the next company.