
Setting Up Group Rights
Group Rights allows you to assign rights to the member users. Navigate to the Tax1099 interface at https://web.tax1099.com/#/users/rightsmanagement to set up the group rights to the member users.
Following are the four types of user roles:
· Admin – Has all rights similar to the Master Admin, including adding/modifying users and assigning rights. However, the Master Admin can customize these rights.
· Reviewer – Checks forms created by Data Entry Users. Can approve forms for IRS submission but cannot submit forms themselves.
· Data Entry User – Has access to all group rights but cannot submit forms to the IRS.
· Custom User – Rights are created and assigned by the Master Admin as needed.
The Master Admin of the account needs to determine which rights can be assigned to users. The rights can be explained as follows:
· People – Allows the user to add, edit, delete, and view payers, recipients, and users under their account.
· TIN – Enables the user to request TIN matches for recipients and check the status/results of the requested TIN matches.
· Import Data – Allows the user to import data/forms to Tax1099 in bulk using the provided Excel templates.
· Forms – Enables the assigned user to create, edit, delete, view, submit for review, review & approve/reject, submit to e-file, print, email, postal mail, and access rejected forms.
· Payment – Allows the member user to make any type of payment in Tax1099.
· Event – Allows the member user to see event log details, showing actions (adding miscellaneous forms or payers) performed by the admin/member user.
To set up the group rights to the member users, perform the following steps:
1. Login to the Tax1099 application.
2. From the left pane, navigate to the Users.
The Member Management page appears.
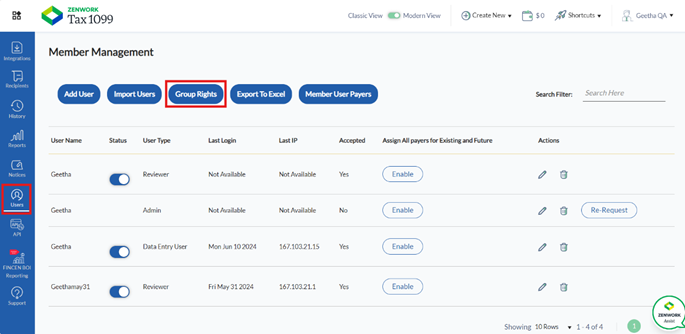
3. Click Group Rights to assign the rights to the member users.
The Rights Management page appears.
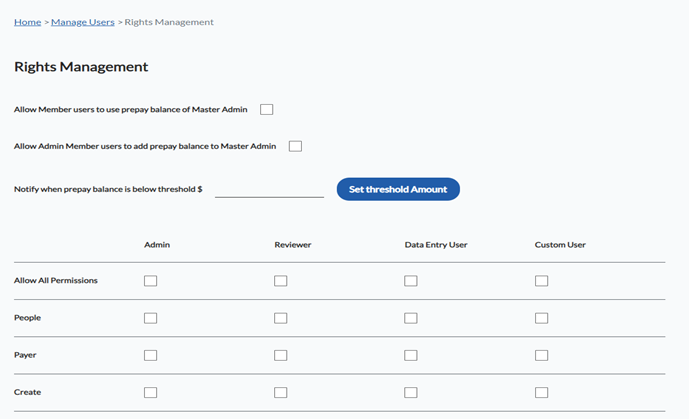
4. Select the Allow Member Users to Use Prepay Balance of Master Admin check box to allow all the member users to use the master admin’s prepay balance.
5. Select the Allow Admin Member Users to Add Prepay Balance of Master Admin check box to allow admin member users to add prepay balance to master admin.
6. Enter the threshold amount in the Notify When Prepay Balance is Below Threshold box, and then click Set Threshold Amount to receive a notification when the prepay balance is under this limit.
7. Select the appropriate check boxes to set the Admin, Reviewer, Data Entry User, and Custom User rights to the member users.
8. Click Save Permissions.
The group rights are successfully set up for the member users.