
Filing BOI Forms
To file the BOI forms, perform the following steps:
1. Login to the Tax1099 application.
2. From the left pane, navigate to the FinCEN BOI Reporting.
The FinCEN BOI page appears.
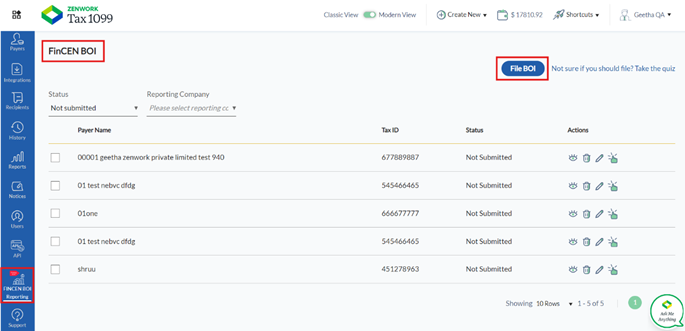
3. Click File BOI.
The File BOI page appears.

4. Select the appropriate reporting company you want to file for and click Next.
Or
Click Add New Reporting Company to add a new reporting company.
The Reporting Company tab appears.
5. On the Reporting Company tab, perform the following steps:
a. Select the Request to receive FinCEN Identifier (FinCEN ID) check box to receive FinCEN identifier.
b. Select the Foreign Pooled Investment vehicle check box to invest in securities or other assets.
c. Under Full Legal Name and Alternate Name(s), enter the reporting company legal name in the Reporting Company legal Name box.
d. Enter the alternate name in the Alternate Name box.
e. Enter the email address in the Email box.
f. Enter the phone number in the Phone Number box.
g. Select the tax identification type from the Tax identification type list.
h. Enter the tax identification number in the Tax identification number box.
i. Select the country or jurisdiction from the Country/Jurisdiction list.
j. Under Jurisdiction of Formation or First Registration, select the country or jurisdiction of formation form the Country/Jurisdiction of formation list.
k. Under Domestic Reporting Company, select the state of formation form the State of formation list.
l. Select the tribal jurisdiction of formation from the Tribal jurisdiction of formation list.
m. Enter the name of the other tribe in the Name of the other tribe box.
n. Under Foreign Reporting Company, select the state of the first registration from the State of the first registration list.
o. Select the tribal jurisdiction of first registration from the Tribal jurisdiction of first registration list.
p. Enter the name of the other tribe in the Name of the other tribe box.
q. Under Current U.S. Address, enter the address in the Address box.
r. Enter the city in the City box.
s. Select the U.S. or U.S. territory from the U.S. or U.S. Territory list.
t. Select the state from the State list.
u. Enter the ZIP code in the ZIP Code box.
v. Click Next.
The Filing Information details appear.
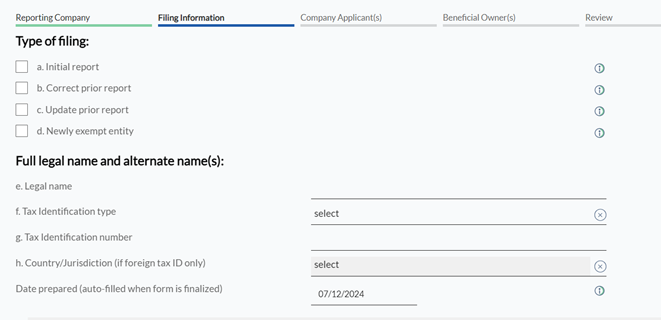
6. On the Filing Information tab, perform the following steps:
a. Select one of the types of filing from the Type of Filing options.
b. Under Full Legal Name and Alternate Name(s), enter the legal name in the Legal name box.
c. Select the tax identification type from the Tax identification type list.
d. Enter the tax identification number in the Tax identification number box.
e. Select the country or jurisdiction from the Country/Jurisdiction list.
f. Select the prepared date from the calendar.
g. Expand and read the Privacy Act and Paperwork Reduction Act Notice.
h. Click Next.
The Company Applicant(s) details appear.

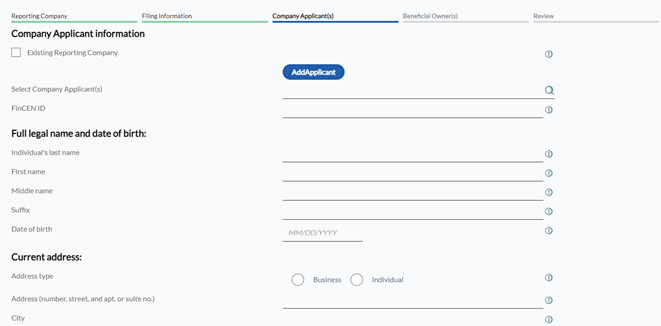
7. On the Company Applicant(s) tab, perform the following steps:
a. Select the Existing Reporting Company check box if the reporting company is already existing.
b. (Optional) Click Add Applicant to add an applicant.
Note: You are allowed to add a maximum of two applicants.
c. Search and select the company applicant from the Select Company Applicant(s) box.
d. Enter the FinCEN ID in the FinCEN ID box.
e. Under Full Legal Name and Date of Birth, enter the individual’s last name in the Individual’s last name box.
f. Enter the first name in the First name box.
g. Enter the middle name in the Middle name box.
h. Enter the suffix in the Suffix box.
i. Select the date of birth from the calendar.
j. Under Current Address, select the address type from the Address type options.
k. Enter the address in the Address box.
l. Enter the city in the City box.
m. Select the country or jurisdiction from the Country/Jurisdiction list.
n. Select the state from the State list.
o. Enter the ZIP or foreign postal code in the ZIP/Foreign postal code box.
p. Under Form of Identification and Issuing Jurisdiction, select the identifying document type from the Identifying document type list.
q. Enter the identifying document number in the Identifying document number box.
r. Select the country or jurisdiction from the Country/Jurisdiction list.
s. Select the state from the State list.
t. Select the local or tribal from the Local/Tribal list.
u. Enter the other local or tribal description in the Other local/tribal description box.
v. Click Add Attachment to browse and select a document image.
w. Click Next.
The Beneficial Owner(s) details appear.
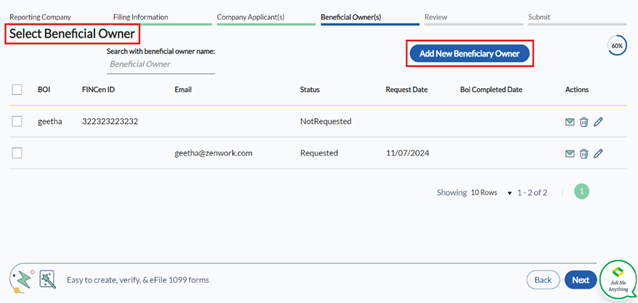
8. On the Beneficial Owner(s) tab, perform the following steps:
a. Select the beneficiary owner from the list of beneficiaries.
Or
(Optional) Click Add New Beneficiary Owner and perform the following steps to add a new beneficiary owner:

I. On the Beneficiary Owner page, select the BOI Request Information check box to request BOI information.
II. Under Beneficial Owner Information, select the check box if the beneficial owner is a minor and provide the parent/guardian information.
III. Under Beneficial Owner FinCEN ID, enter the FinCEN ID in the FinCEN ID box.
IV. Select the Exempt Entity check box to exempt the entity.
V. Under Full Legal Name and Date of Birth, enter the individual’s last name or entity’s legal name in the Individual’s last name or entity’s legal name box.
VI. Enter the first name in the First Name box.
VII. Enter the suffix in the Suffix box.
VIII. Enter the middle name in the Middle Name box.
IX. Enter the email ID in the Email ID box.
X. Enter the phone number in the Phone Number box.
XI. Select the date of birth from the calendar.
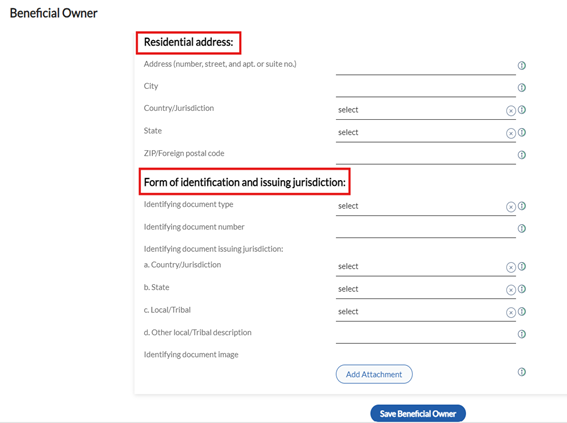
XII. Under Residential Address, enter the address in the Address box.

XIII. Enter the city name in the City box.
XIV. Select the country or jurisdiction from the Country/Jurisdiction list.
XV. Select the state from the State list.
XVI. Enter the ZIP code in the ZIP/Foreign Postal Code box.
XVII. Under Form of Identification and Issuing Jurisdiction, select the document type from the Identifying Document Type list.
XVIII. Enter the document number in the Identifying Document Number box.
XIX. Select the country or jurisdiction from the Country/Jurisdiction list.
XX. Select the state from the State list.
XXI. Select the local or tribal from the Local/Tribal list.
XXII. Enter if there is any description for local or tribal in the Other Local/Tribal Description box.
XXIII. Click Add Attachment to add the identifying document image.
XXIV. Click Save Beneficial Owner to save the beneficial owner.
b. Click Next.
Notes:
· Click the  Email icon to send BOI request.
· Click the  Delete icon to delete the beneficiary.
· Click the  Edit icon to edit the beneficiary.
The Review details appear.
9. On the Review tab, review the entered details, and then click Next.
The Submit details appear.
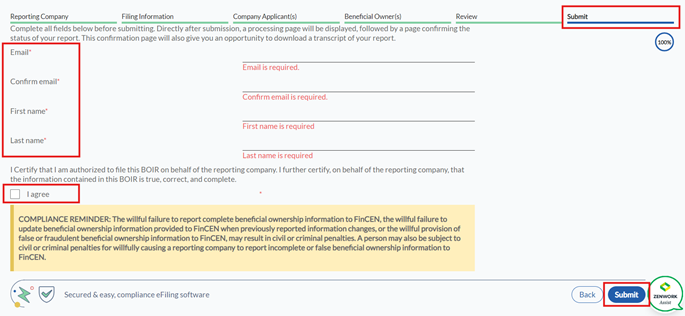
10. On the Submit tab, perform the following steps:
a. Enter the email address in the Email box.
b. Re-enter the email address in the Confirm Email box.
c. Enter the first name in the First Name box.
d. Enter the last name in the Last Name box.
e. Click the I Agree check box to accept the consent.
11. Click Submit.
The BOI form is successfully filed and added to the FinCEN BOI page.